Friday, April 22, 2011

Nature Play!

Last week we had a wonderful time enjoying the awesome weather that we were Blessed with!!! As soon as  I picked up the last child from school, we headed to the park with a pre packed picnic snack! It was pretty windy and still semi chilly (winter coats), but it was nice enough after a Northern Illinois winter!!
We started by getting our Nature Goodies out of our bag (Collection box for treasures, specimen jar, magnifying glass, tweezers) and sat on a blanket (I always keep an old comforter in my trunk) to snack and read:
After that we headed out and everyone was able to examine what they wished, collect what they thought would look great on our nature table. 
When they were through with that, I opened up our travel case of play scarves and grabbed their walking sticks and we made some kites, tents, flags, blankets, bridges...etc. I'm a huge fan of Waldorf Learning and love their play silks! I don't follow Waldorf, just enjoy many of their pieces. Whenever I go to tag sales, garage sales, thrift stores, I pick up scarves that are under .50 and keep them in this small vintage travel case. The kids ALWAYS have a blast with them and get so creative!! We have about 15 scarves and always collecting more. It's amazing to see what kids can come up with! They have been aprons, dresses, baby carriers, party decorations, curtains and so much more.

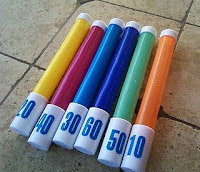
I recently found these diving rings in the 1.00 spot at TARGET and knew that they were PERFECT for the scarf box! They work when there are no sticks available and have been known to hold multiple thin scarves as a ribbon train and used alone for an impromptu ring toss game in the park when they put sticks in the ground! A child's imagination is endless!!

What is something that you never thought your kids would play with so much? Share in the comments please!!
~Michelle!~

Thursday, April 21, 2011

Right Now........

Right Now I Am...
  • Exhausted from playing and planting on our first nice day this week!
  • In love with blog hopping! (Share your blog link in the comments!)
  • Sitting in a cozy corner of my living room as my kids watch a movie.
  • Watching Bedtime Stories, but my kids call it Raining Gumballs!
  • Thinking of all the fun we are going to have on Spring Break!
  • Painting my toenails, gotta look pretty fora Easter!
  • Wishing the my husband could be here with us!
  • Sipping green tea.
  • Feeling my laptop getting hot! (Have to get my lap table!)
  • Planning our schedule for this upcoming Summer.
  • Smiling, as I watch my 3 kids laying side by side on the living room floor.
  • Happy with what I have been Blessed with!
What are you RIGHT NOW????

~Michelle!~

Thrifty Thursday

I was super lucky on this past week's thrifty hunt! I found a mint condition, still NEW and unused Bento box from Laptop Lunch!! I love to make my kids fun and super cute lunches that give them a little break in the seriousness of school! When I found this for...are you ready??? .99! I about died! There were actually people in front of me when I spotted it and I reached right in between then and snagged it up! SQUEEEE, it's perfect! It was all shiny and untouched and unopened and perfectly packaged!
My daughter took it today and she things it's so cute! Now let's hope the lunch was just as good! haha!! She always has a report on what could have been better, what not to use anymore and what needs to be colder or warmer :) She is very opinionated, but that's alright! So is Mommy! lol!
My favorite part of lunch today? The baby carrots with cilantro ends!!! hahaha!! I gave her hummus to dip with and part of me is thinking I may make these again for myself to have at lunch today!
Share your creative lunches please!!!


~Michelle!~

Wednesday, April 20, 2011

Sorting Fun


As you read in Monday's post, we are working with marshmallows this week! Today, we woke up to SNOW in the Midwest! Yup, we were wearing shorts last week and now it's back to Winter coats and sweaters underneath! YIKES! It was definitely an indoor learning day for the little tater tot!

You've seen him before, when he first learned how to use my craft punch! He had a blast just punching anything that was in the scrap bin! The circles were so cute and fun, I had to keep them for other projects!! We made some great stuff and I will continue to share them in future posts!
Materials:

We used a 1.5 inch punch, marker, plastic eggs and egg carton for this project.
I numbered each circle with 1 number 1-12.
We only used half of an egg in each of the holes and then put 1 circle in each one (yellow paper made them look like yolks!).
I handed him a bowl of marshmallows and told him to put the same amount of marshmallows in each numbered egg. It got tricky when it got to 8 and above, but it was still a lot of fun!!
Share your sorting activities in the comments!!
~Michelle!~

Tuesday, April 19, 2011

Craft in a Minute! Lacing Food

 
Today's Craft in a Minute is so simple and so fun! I like to make special snacks for all of my kids and I always try to avoid just throwing some stuff in a bag. This week I wanted to try something different and went with our recent lacing fun we had last week. I purchased Twizzler Pull and Peels and separated them into individual strips. Then I used straws of different consistencies to make holes in fresh fruit and Voila! Perfection! For snacks at home, I use the longer Twizzler straws and the kids have so much fun, but for snack it was just the right size!!
Snack and Craft in a Minute!!!


~Michelle!~
=============================
SIDE NOTE:
Undergrad Fab is having a SHOPBOP giveaway on her BLOG, head on over!!
================

Linked up here:

Monday, April 18, 2011

Right Now........

 Right Now, I Am...
Reading 3 new books that I picked up throughout last week. They have been on my Nook wishlist for a long time, but seeing them at tag sales and thrift stores for less than 1.00 each was just too good to pass up!!


Mind in the Making, Babyproofing Your Marriage and 365 Art & Craft Activities. I am eager to dive right in and hopefully finish them up by the end of the weekend. Everyone is always so amazed at how quickly I can read, but if you think about it realistically we spend A LOT of time in vehicles waiting, offices waiting, lines waiting... I always have a book or my nook handy and read whenever I can! When my kids are in Chinese class, I'm reading! Gymnastics? Reading! Waiting for school to let out? Reading!!!
I was lucky enough to find this fantastic basket this weekend and doesn't it just make the colors of the blocks pop?! Wish it wasn't the last one and that i could get my hands on more! I LOVE color!!!


~Michelle!~

Shaping Marshmallows

When the weather gets so windy that kids are blowing away, we look to indoor activities!! Marshmallows were just the right kind of thing to take a 3 year olds mind off of the water table! I decided we would work with shapes, toothpicks and marshmallows! Roman thought this would be a GREAT IDEA! (well he ate 6 of them first! haha)
 First we played! He wanted to build houses and have a town! That plan was short lived, when he started just adding to his first house.
He was having so much fun, that I decided to sneak a shape worksheet on, to see if it would go noticed. At first he built on it and then moved it aside, but before long, he was looking at it and ready to start making the shapes that he saw!
As he made them, I would point to the name and say it out loud. He thought some of the names were funny and was laughing more than building at some points. He would repeat them after I said them and he was learning, because he would say Octagon, Stop Sign! So he was slowly getting it and at this point more building of shapes than eating was happening! haha! All in all a successful little project!

Here is the worksheet I used, in case you would like to try it! It's perfect for using in other activities too, not just marshmallows! I love materials that can be used multiple times!!! Share some of your shape projects!


~Michelle!~

Sunday, April 17, 2011

Counting Fun!

I found this fun apple page at Homeschool Parent and knew it was just what I was looking for!! I'm trying to get my little guy to start counting higher than 10 and also identify the numbers! (we use lego flowers, since I use a lot of lego in my shop! I slipped it into a page protector, so that we can use it over and over again! Share one of your favorite print outs!!

Saturday, April 16, 2011

Thrift Stop!

After writing this post on thrifty teaching aids:
I have gotten many e-mails, to keep updating my fun buys! Remember that you don't have to go to a specific charity shop, just go into one! I for one can be a total store snob, I admit it, but thrifting is FUN! There are so many treasures you can unearth and believe me, I've often times found new in box toys and books and game sets that are perfect for lessons or inspire new ones. 

Today, I ran in just to do a quick check at the local Goodwill (snob about to come out here). I cannot stand this Goodwill and if I were the company I would invest in making it as nice as the others I have been to (every single other one) AND be more careful about what they put on the shelves (stained items, torn items, broken stuff etc.) The minute you walk into this one, you just get that ick feeling, BUT I figured I will give it a shot, since I struck out at my 2 other local stops.Go figure I found some great stuff!! 

I did take the time today to write them a customer note on their website with my receipt information, so hopefully that will help somewhat! haha!!On to the good stuff!

Goodnight Moon is HUGE, it's the Lap Size for the classroom and perfect for all 3 kids to see while I read at bedtime! The Vintage Clock is a puzzle too! This is going to be very helpful in teaching Roman the Time basics and we can also use the numbers in different games too! My favorite purchase was the magnetic Pattern Blocks and Book, these were in a ziploc freezer bag, so I put them in the red pouch to make it more portable. I then dug through my supplies and found a cute little iron on to pop onto the pouch to make it cute and my youngest son fell in love! 
I took an iron on patch that I had in my supplies and put it right on this drawstring bag I had and now this little set looks good as new and Roman has already started carrying it everywhere to play!
Goodnight Moon .79
Magnetic Blocks and Book .99
Clock .99
Total spent today under 3.00!!!

Friday, April 15, 2011

Making a Chore Chart!

As my kids get older, they start taking on more responsibility around the house. I find that giving them little chores, helps them learn that a house only works if the members of the family work together and it also keeps them involved doing something when I need to tackle heavier chores. I put this all together with stuff that I have in the house, I knew for sure I didn't want to buy anything else for just this project.
This was a small project that the kids could help me with, so that they could understand more of what we were doing and why. We decided to work at the craft table, so that we didn't have to carry around the supplies that were found right there.
I used library book pockets (yes, I use these a lot don't I! haha) and flashcards to write all the chores on them (6 year old) and then cut them out with wavy scissors (5 year old) and use a glue stick to put it all together (3 year old).
I took little die cut boys and wrote out everyone's name on two of them and then they were glued and taped to craft sticks (combination of everyone working together).
We all read the chores together and then I assigned them the first time around. I do not reward them with money for doing chores, as this is something that is just a fact of life. They do earn little things for making it to the end of the week with a completed chore list. The things they can earn are:
A day off from 1 of their chores.
Opportunity to assign the chores (this is the fast favorite)
Chance to switch 1 chore with someone else.
I then stuck all the pockets onto our good behavior chart, so that it's always in one place and clearly visible (In the playroom on the wall).

That's our chore chart!! Share yours!

Thursday, April 14, 2011

For the Birds!


My youngest and I read books about birds and then we took our binoculars outside and watched for some as we lay on our backs and stared in the sky! We wondered what it would be like to fly and where we would go, Disney World (me!) and McDonald's (him!). We marveled at all the colors that could be found on birds and even visited a pet shop to look at birds that could be kept as pets! Upon coming home we started our craft of the day!

We dug around in our bucket of CAPS, CAPS, CAPS and found one that belonged to a trail mix bucket and we were ready to roll! We were going to make a bird feeder! We waited until the big kids got home from school, so that all could be involved in putting in the seed and hanging it up!  Let's hope we get some birds!

Share a link to your homemade bird feeders in the comment section please!!

I'm Blog Hopping Today!

Craft in a Minute! Easter Crosses

 Today we made a quick craft to go with our Stations of the Cross readings and also as something for Easter. How simple is this??? Clothespins and glue and paint! That's it!! Just make sure that an adult takes the clothespins apart, just in case the springs are a bit difficult. It will take 4 clothespins for 1 cross.
Do you have any quick crafts to share????


Linked up here:

Wednesday, April 13, 2011

Making Playdough!

Today we had some lesson plans on learning about time and crafting with clocks, but I decided to push that off to this afternoon, so that we could get in the kitchen and create something to take outdoors with us! My 3 year and old was an assistant today and he was eager to mix and play.  First, we gathered the ingredients needed (List at the bottom of page) and then I got out a mixing bowl. I know you can make it all over the stove, but I wanted my son to be able to help and I don't let him near the hot stuff in the kitchen. I had him toss it all in the bowl and mix it up and then I had the 2 cups of water in a large jar, where I let him squeeze the food coloring in and stir it up apart from the rest of the mixture, so he could see the color appear in the water first. We then mixed it all together into 1 bowl and got it prepped for the stove.


Once on the stove, mommy took over and for a second, I was unsure of what I was supposed to do other than stir it up (nothing). I used a recipe from a homework assignment my preschooler brought home and added some vanilla for scent. I tried looking for an internet recipe, but the first one I tried was missing the amounts of water I would need and then another one I had found didn't list some of the ingredients that I did have and added some that I didn't have in house, so I went with what I had!

After about 3 minutes, I was left with this incredibly shiny and sticky ball and I was so worried that I wasn't doing it right, but I kept on mixing for about 2 more minutes and it started to smooth out!!

Finally, we were successful!!! I used old store containers to hold the colored balls of dough and the kids have been having a blast ever since!! From start to finish it took us about 10 minutes and that's WASHING up afterwards too!!! I'm so happy to find something that my little ones love and can help with too!! I'm planning on putting small amounts into smaller containers to give to my daughters class for Easter!

What you will need:
2 cups of water
2 cups of flour
1 cup of salt
Food Coloring
1 TBSP of cooking oil
1 TBSP of Cream of Tartar

Mix everything together over medium-high heat and continue mixing and stirring for about 5-6 minutes. You will see the dough thicken and eventually begin to smooth over. Once you remove from stove, let it cool for 2 minutes and store in an airtight container!

I'm linking up here:
Photobucket


Tuesday, April 12, 2011

Color Matching

I'm sure by now, you know that I love buttons and I try to use them in as many crafts as I can! Today's simple game was made up from another border, that I cup up and put on a ring. This is the perfect on the go activity that I can keep in our Busy Bag and just toss one in my purse too! I have a small little bag on the ring that holds 1 button in each color that matches the cards and all he has to do is match them up!!

It's a simple activity that still manages to entertain all the kids when we are desperate, because my 5 year old can practice his spelling of the colors, while my 6 year old plays 'teacher' and has the boys do the spelling and matching work.

Monday, April 11, 2011

Craft in a Minute!

 This week's craft in a minute is so simple! This is a great way to breathe new life into an old puzzle or make some fun magnets. It's a great craft that even the youngest learners can get involved! The total for this project came out to be under 3.00!You need magnetic tape (2.99 with a 40% off coupon from Michaels) scissors and any old wooden puzzle, I picked this one up in the dollar section of Michaels too!
 Today, my partner was my 5 year old son! I used the scissors to cut the magnetic strips into the right sizes for each letter. I let him peel and stick away!! Before they were even done, the kids all had their magnetic boards out and were playing away!!
Can you tell they loved them???!!!

Sunday, April 10, 2011

The Nuts and Bolts of it All!

 The hardware store can be a fantastic place for getting toys that the kids can play with for hours!
I went and bought Nuts and Bolts and a Wrench! That's it!! All 3 children played for 2 hours in many different ways. There were counting games, races, contests, sorting and just so much creative fun, I couldn't believe that a total of 4.67 was bringing in this much fun!
One of their contests was to see who could put the most nuts on their bolt and they figured on some of them, they could get up to 8, but on others only 4!
My daughter liked working with the wrench best, it's a great lesson in patience, trying to get everything adjusted just right in little hands.
They also sorted them into the different sized nuts as they unscrewed them. They cooperated really well together and made sure each one had a job at all times. For a little bit of money, this bought me some nice quiet time!!

**PLEASE NOTE**
My children are older and do not put toys in their mouths, please be careful and watchful at all times with children when attempting this activity!

Saturday, April 9, 2011

More Fun with Buttons!

I have already mentioned how much I love buttons before, but my passion are vintage ones! Celluloid, pierced buttons always seem so magical! When I work with buttons for pieces in my shop, I often find little hands that are itching to get in my prized collection! I've learned to keep a sorting tray on a low shelf with a small jar of buttons just for them! They use these to sort the colors and sometimes pull out interesting ones along the way! A quick and easy tip to get some time for yourself!!
Related Posts Plugin for WordPress, Blogger...