Showing posts with label recycle. Show all posts

Thursday, April 16, 2015

Junk Drawer Learning

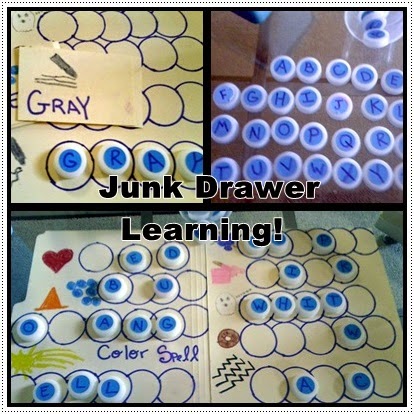
If there is one thing I love doing the most, it's making art from items that would normally be thrown away, something else I love to do, is to make learning manipulatives! A few simple ingredients that we had around the house and 1 hour of Criminal Minds and I had a Color Spelling Game!
This game is perfect for a literacy center for kids to work on quietly alone or in a group. All you need are:
1. Used File Folder
2. Water Bottle Caps
3. Circle Labels (But you can use a sharpie right on the labels if you want!)
4. Dark Marker
5. Crayons
Once you have gathered all your items, just make up the alphabet on labels or righto on the caps and then add in the extra letters you will need for colors that double letters in their spelling. My game is for color spelling, but once you have the caps made, you can just make multiple file folder games using the same caps! Use your folder as your game mat and add on whatever you need to do and then draw circles or lines, so they know how many letters are in each word!
The caps can be used with the game or alone as an alphabet game or even for use with some spelling list words, to spell names and numbers as well!
Use cardstock or cut down an old file folder to make self checking cards with the correct spelling and the same picture that you used on the game mat. These cards can be used alone or with the game mat.
Pop everything loose into a baggie and staple it to the back of the file folder, now it all stores neatly and together.
Enjoy every minute my friends!


Photobucket
   Follow Me On Facebook!
   Follow Me On Pinterest!

Friday, November 14, 2014

DIY Learning Games

Happy Friday!! Boy how good does it feel to say that? This has been a draggy week (is draggy even a word?!) and I am very happy to welcome the weekend with open arms. I am ready to dive right into the weekend and not look back so today's post will just be a round up of learning games that I have created over the years, photographed and then never posted about. Life seems to always get the best of me and I can't say that I mind! Here is a simple alphabet game using water bottle caps, paint chips, stickers and a marker! Easy and saving plastic from the landfills! 

Chicka Chicka Boom Boom...will there be enough room?? This book is a long time favorite in our house and we must speak about it a lot because at one point we had FIVE copies?! Hardcovers, soft covers, signed...you name it! I am also the mother of fidgety boys that love to wander around while I was reading, so I created a game for them! Taking linking monkeys and then writing letters on their bellies, and a plastic tree turned coconut tree, I created a chick chicka boom boom prop and the kids would search for the letter I was reading about and place it in the tree. There was never enough room for those silly monkeys and just like in the book it would topple over and the letters would scatter about. 
Counting is a simple thing to do, but it gets boring learning the same old way! Using pieces from other games that I saved when parts went missing, I created this matching and counting game when I added in animal counters as well! Remember, anything can be a counter but the brighter and more fun, the more it's like playing and less like learning! 

Teaching simple addition and subtraction? Flashcards can be ever-so-boring! Add in some unifix counters and then the children have a visual tool to use and see the answer. As they configure the problem with the cubes, they are repeating the problem in their head and counting with each cube. This is helping them remember even more!


Remember my friends to take the time to remember every minute! Enjoy your weekend!

Photobucket
   Follow Me On Facebook!
   Follow Me On Pinterest!

Thursday, November 6, 2014

Upcycle & Play!

If there is one thing we love to do in this house, it is recycle and upcycle! As you can see from almost all of my posts, I enjoy giving everything multiple purposes. This way items are constantly seeing new life and not the trash heap. 
One of our favorite things to do is Cardboard Building! Whenever we get a delivery of something in a large box, the box is always the hot item. First it gets massive amounts of play AS IS, but then it begins to take on a world of it's own when it's starting to get a bit too warped.
Cutting slits into the cardboard makes them stackable now! They use the slits to interlock the pieces and build away!
The best part about cardboad building? When playtime is over, it stores flat! When it gets too torn up, it gets recycled and when it's time for more fun, the cardboard is always FREE!!
Something else we used A LOT around here? Baby Toy Links!! I use them everywhere to hold stuff up. Here they are on our school cart, holding bags of library books and stuff we need for an upcoming project. In my daughters room they hold her purses on a rod, in my room they hold scarves...on and on it goes! 
YES I DO!!! Enjoy every minute my friends!!
Photobucket
   Follow Me On Facebook!
   Follow Me On Pinterest!

Tuesday, November 4, 2014

Take Out Tuesday

It's Tuesday and today I am just going to take some time out of my scheduled blog posts and just ramble on about a mish mash of things! Our co-op took a field trip to a working fire station yesterday and I have never met a more personable group of people. They were AWESOME with the kids and really put together a great trip for us. What a blessing that we get to take these trips and enjoy them as we do with friends both new and old! It was definitely a fun Monday and as most homeschoolers do, we ended the day at the library! It was funny listening to all the families as they were packing up to leave and hearing how many were headed to the library, with 12+ branches between us all, we were all headed in different directions but still with the same goal in mind...books truly do open up another world.
My craft in a minute involves upcycling containers! Many do not have labels that can be peeled off or have labels that are just too stubborn to come off. I don't have time to soak them (when is the sink empty enough to do that?) nor do I have time to peel them little by little. We make it a fun project and let the kids go wild with collage photos from old maps, magazines and travel guides. They use those and packing tape and voila! a new container is born!
A way to keep my kids helping me upcycle, I keep this cup hanging right above our recycling bin and they know to throw in pop tabs (Ronald McDonald House), Batteries (Ronald McDonald House) and caps of all kinds (upcycling). This helps me keep it all contained until we need to deliver them somewhere or use them! Rod & Cup are both from Ikea!
A sneak peak at an upcoming blog post this week! Cardboard creations are so easy to make, store flat and are great for hours of fun...oh wait and they are free too!
Yesterday was a fantastic mail day as our Disney Cruise package arrived AND the Spectrum workbooks I will be reviewing for this blog! Check out all their goodies HERE and be sure to like their Facebook page HERE! I love their workbooks and have used them in the past to prepare my children for testing and to evaluate if they are at the level where they should be, before I pay for their state testing to be done. I look forward to diving right in with these and passing along my honest opinion of them in the near future!
Remember my friends that every day is a gift and to take time to enjoy each and every minute! Good things are just around the corner!
Photobucket
   Follow Me On Facebook!
   Follow Me On Pinterest!

Monday, August 25, 2014

Recycle and Make New!

Do you have chunky puzzle pieces or even worse...board books that have seen better days? Are the pages tearing out, missing pieces or just ready to go to that great book heaven out there? Give them new life by salvaging all the can be saved and punch holes in them all around the edge to make Lacing Cards! Add a shoe lace and pop them into a pencil pouch and you have a busy bag! If you don't have any shoelaces, use string and tape the ends to make a "needle" and you are all set! Want to get even more involved? Pick up wood spools from any craft store and wind your laces around them for a mini 'sewing kit'!
If you are new here, we are on our way to Disney World and I am making the Littles Epcot Passports and adding 1 page a day. Page 2 has been added HERE and there are plenty more to come. I will post a link to print all pages when the passport is complete! Take a look and remember when you hover over a photo on my blog, you can pin it easily to pinterest!

Remember to enjoy every minute, but to also take time to do some good in the world!

Photobucket
   Follow Me On Facebook!
   Follow Me On Pinterest!

Tuesday, May 6, 2014

Loving Learning!

Did you know that it's not quite as hard as you think to have children that love to learn? No, really! All 3 of my kids absolutely love to engage in any form of learning, the secret? I make it fun!! Simple toys can become learning experiences when you add in some alphabet or number stickers. Blocks can help with spelling words when you add stickers on those too! Rub on letters on rocks are fun to make and help create a word garden out of rocks! It's NOT expensive to get creative and you usually have the stuff you need on hand already. Look around and let your mind lead the way!
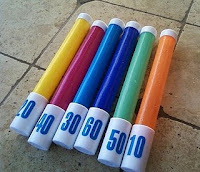
A sharpie on some bath tub slip stoppers creates a fun game for bathtime or water table play! Work on learning numbers for the Little Ones and then make it into a math game with addition and subtraction of numbers! Work your way to Multiplication and Division too! This is so easy to adapt for many different age levels.
Still don't have that stuff laying around? Check your recycling bin for anything and turn it into something else altogether! A yogurt container turns into a green house when paired with the bottom of a 2 liter bottle and you drill holes on the bottom of it, use the lid as the water catcher. Use a crystal lite container to transform it into a see through planter, where you can watch the plants roots as they take hold in the container. 
It's not hard at all to get creative and it's definitely not expensive! Sorry for the delay once again in writing, we have been busy finishing up our school year and then picking up a huge volunteer job that the whole family gets to help out with and takes over our Saturdays! Until next time my friends, when I will share more recycling fun! ~Enjoy every moment!


Photobucket
   Follow Me On Facebook!
   Follow Me On Pinterest!

Wednesday, August 17, 2011

Treasures...Recycled Fun

Hello everyone! It's been a hectic day, so I have not gotten around to take photos of this week's recycled treasure! Hopefully I can do that later today. Instead I wanted to share with you my latest FACEBOOK ALBUM.  This is a compilation of all the items that we are constantly saving in and around our home! They usually make awesome storage or help in other ways around the house. This is a list that I try to add to at least once a day, so it's an ever changing one! If you ever have any questions as to why I save what, feel free to comment under the photo on Facebook or even here in the post!
We keep everything stored in 1 container and that's it. If it gets to be more, then we purge. There is always something coming out of this house, so we don't have to worry about not having what we need on hand! That's what's so great about re-purposing items! It's fun and teaches the kids a great lesson! Head on over to my FACEBOOK page and leave a comment!


Photobucket

Wednesday, August 3, 2011

Wednesday Treasures...Recycled Fun


It's time for another episode of recycled treasures! We love to reuse items here in this house, as proof that it's possible to turn something into anything! we also love to do it, because it saves the earth just a little bit. Today, we are in the mood for a scavenger hunt and since it's cooled down a little bit, we are taking it outside! As we grabbed our outdoor field guides, magnifying glasses and specimen containers, an idea hit!
We needed something to hold all our goodies, so that we didn't have to keep digging them out of the backpack and I knew just the thing. A quick rummage in our recycling bin and I found this fantastic container, that housed kiwi's! I punched a hole on each side, added a pipe cleaner handle and then the kids taped some fun animal shapes on each side! We had all our goodies contained!
As the kids began their hunt and collection, they all began to wander in search of the next big thing! Their specimen jars were full in no time and we lounged around outdoors having lunch too. They were not ready to go in yet, so another idea was born!
I ran inside and printed out a fun scavenger hunt sheet, this was made up of items actually found in our neighborhood! This way, we would incorporate a walk into a nature hike and scavenger hunt all in one! I laminated it, punched a hole in it and added a book ring. Now it was ready for the kids to clip wherever they wanted to keep it handy! Add in a dry erase marker to the tool bin and we were set.  This was so that they could put the initial of the person who found that item on the photo, to keep track of who found what! Oh wait! We need more specimen containers!!
Another rummage through the bin and egg cartons were produced! I only needed 1 for this, but we made 3 just in case they wanted to use them in the back at a later time!  I added a pipe cleaner handle through each side and we had an open specimen container! This way, they could put a small sampling of each item in each of the smaller cups, for us to observe once we got back to home base! 
What have you recycled lately??
Share your recycled posts in the links below please!


Photobucket
Linked up here:
OliviaBlueMusic

Wednesday, July 27, 2011

Treasures...Recycled Fun

It's time for another day of fun with recyclables! Today, we realized that school is right around the corner and it was time to get organizing. I will have 2 kids in the same school this year, instead of 3 kids in 3 schools! For the 2 older kids, I wanted a way to organize their folders and school papers as soon as they walked in the door.
We went through our boxes and selected 2 cereal boxes and cut off the tops evenly. Then wrapped then in Kraft paper like a present, leaving the cut top completely open. My kids painted the Kraft paper first, but you don't have to. After I wrapped them all, I let the kids decorate the insides and outsides as they wished and then glued them together! All set and ready for school to start! Have you upcycled anything lately?


Have You Added Me Yet?


Photobucket
Related Posts Plugin for WordPress, Blogger...