


With back to school in session, it's also time for back to school lunches! Break out of your lunchtime rut with small containers, tapas style! I like to use a variety of small containers and tuck them into 1 large container. This offers a plethora of lunch choices, while allowing only a sample of each. Yes, we are now homeschoolers, but we are always on the go!
Top 10 things to have in your lunch making drawer:
(in no particular order)

1. Mini Wood Skewers or Toothpicks
These are perfect for fruits, veggies, cheeses...anything! Putting them on a stick makes them not only look better, but also allows more room for other things in the container. Sometimes the longer skewers are cheaper, so I just soak them in water and cut them in half, still works perfectly!
2. A Variety of Cupcake Picks
Cupcake picks work just like the toothpicks or wood skewers, but allow you to theme your lunches by holidays or even just brighten them up. You can also print your own to send messages to your littles. I love adding a couple of these to each lunch, just to let them know that I put a little thought into it! You don't have to go online crazy buying these either (GUILTY!), you can just save them after parties, when you buy cupcakes at the store or when your kids bring them home and wash them up. The great part of using these, is that they are re-useable! Even those plastic ring cupcake toppers can work by holding carrot sticks or lunchmeat rolls, pepper strips...you name it!
3. Mini Cookie Cutters.
These are my favorite part of cute lunching! Use cookie cutters to shape cheeses, meats, fruits and anything else you can think of. This gives the lunches a fun look that shows your littles you are thinking of them and at the same time you can imagine their faces when they open them up. Perfect to theme your lunches and the letter or number cutters allow you to even spell out a message.
4. Silicone or Paper cupcake liners.
Not only do these allow your lunch to POP with color, but they serve a purpose too! They are perfect for packing multiple items in one container. Keeping everything separate, they allow the foods to keep their own flavor.
5. Corn on the Cob Holders.
I love popping these into the lunches for the kids to use as fun forks for their foods. If you have younger children, where these might be too pointy, they sell a variety of mini forks at the party stores or just send extra toothpicks. 
6. A Mix of elastic headbands and rubberbands.
Sometimes I like to send ranch dressing or hummus or something that may have a type of liquid in it, I like to reassure myself by banding the lids shut. I use the larger elastics for the big container, not only to keep it shut, but then I can also slip in a note and a napkin and it all stays in one place!
7. Edible Markers
I love food markers, because they allow me to add a little smiley face to a boiled egg or an I LOVE YOU to a piece of cheese...anything you want can be made when you have these instruments at the ready!
8. Crinkle Cutter
These are awesome for when you don't have the time to use cookie cutters, they give a polished look to anything!
9. Fun and Colorful Notecards
I LOVE to use calendar pieces from teacher stores, because I can use the number of today's date and write a message on them with a dry erase crayon. Because they are laminated, I can use them over and over again and even buy holiday themed ones. Using the dry erase crayon, means the message will not rub off before lunch!
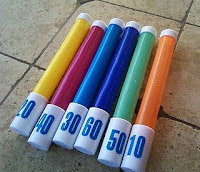
10. The right containers! I love doing it all up Bento style, with each item in its own container and these food storage containers from IKEA are less than 5.00 and have enough containers to send a lunch for 2 children, with plenty left over! The ones in the photo marked 'these' are the ones I use in the lunches, due to their size. The smaller ones all tuck neatly into the larger one as shown in the main photo above. Some have to be put in sideways, but it all works like a puzzle. The large ones that are not labeled are the ones I use for lunch items. When I first buy my groceries, I have always said that I wash and cut them right away, by doing this I am saving precious lunch making time. Storing them in the excess containers, means that nothing goes to waste or unused. The price of these containers means that if any are lost or broken or get too worn, it's no big deal to toss them and start again.

Follow Me On Facebook!
Follow Me On Pinterest!