Showing posts with label crafty mama. Show all posts

Thursday, May 5, 2011

Sailing Out of the Box!


When I was approached with an awesome idea from Tinker Lab about getting creative with a cardboard box, I knew straight away that this was something we were IN for! She is celebrating her blogging anniversary and what a great way to celebrate! It's one big blog party!! We have been wanting to make a spaceship for quite some time, but when the time to truly decide came around, the ideas were flying around like crazy!!


Gabriel: More Railroad and Car track like we made before:
http://michellescharmworld.blogspot.com/2011/04/craft-in-minute.html

Autumn: Wagon to pull kids and animals in

Roman: Circus Train

Gabriel: Roller Coaster

Roman: Race Car

Autumn: Space Ship

Roman: BOAT!!!

The Boat was obviously the winner and this is them working on it!
It is meant to be a child led activity and I am only there to help with the sharp stuff and to finish out an idea they have. Gabriel can be seen in the above photo gluing on the waves, they brought out our blue blanket that we usually keep in the car for outdoor activities and such. Roman is inside holding the glue on the dials and Autumn is fixing up the flag. They had a rough time with the flag and went through many different materials, before settling on a dowel that I happened to have! (first they tried paper towel tubes, then a wire hanger)


First things first, the little guy insisted it be named after him! hahaha!!! The Roman it became, and then it turned into a lesson as after my oldest wrote the name Roman insisted that there was NO Q in his name! The lower case A looked like a Q to him!

They put in a site scope because this started out as a pirate ship, if you look to the extreme right of the boat, you can see where it started to tear when they tried to get 2 of them to fit in the boat! haha

We used toilet paper tubes and old Disney World maps to make 3 sets of binoculars, when it became a whale watching boat (and penguins!!). They were able to do these themselves after I made the holes for the laces to go through and tied the knots.

Finally, they settled and it has remained a fishing boat! We were in the Dells and they saw some people fishing from their boats as we took a boat tour and I'm pretty sure that's where they got the idea from! I cut the fish, as it was cardboard and drilled the holes to make the fishing poles. They hooked on the paper clips and glued down the magnets!

PhotobucketAll in all we have had a blast and the best part? This boat and 'river' have stayed in our living room for over a week and the kids keep playing with it almost daily! Please check out the linky and join us on everyone's cardboard box adventures!!!


~Michelle!~


:
It's Playtime at hands on : as we grow

Tuesday, May 3, 2011

Tuesday Giveaway!

 
Hello everyone!! I truly hope that your weekend was wonderful and that you are ready to take on this new week. I've been cleaning out our bookshelves of books that we have multiples of (Having 2 kids in school and getting books from teachers often does this!) and ones that we have worked our way all the way through. This week, I would LOVE to give away: Mission Addition. This is perfect for the young child and my 6 year old really enjoyed it. She is in Kindergarten, but taking 2nd grade math and this was a great book for introducing concepts to her.

GIVEAWAY ENDS MAY 20th!

In order to win you only have to FOLLOW MY BLOG!
Let me know in the comments that you are a follower!

==========================================
Win additional Entries:

1. Follow Me on Twitter and Tweet about my Giveaway
(Leave a comment with the URL of your tweet)

2. Blog about my Giveaway!
(Leave a comment with the link to your blog!
======================================


We spent the weekend travelling Wisconsin and I had 2 of my trusty companions with me! haha!! A good friend and a good magazine! How did you spend your weekend??


~Michelle!~

Monday, April 25, 2011

Sewing With Kids!!

 Every Summer, my 2 cousins, my sister and I would be sitting on my grandmothers screened in porch taking sewing lessons with the other neighborhood kids. Do you remember your Summers of youth? We would all be dropped off every morning before our parents would go to work and our days would begin. I loved every minute of it! There was no television, video games or computers, there was a small cassette player and the rosary playing on deck. We would all have our own tiny plastic chairs that we chose ourselves at the market at the beginning of the season. Our embroidery hoops were colorful and our threads all the colors that we chose! We would sketch out own designs and my grandmother would have us all working quietly for hours! We would pray, chat and joke around, we would break for the paleta man and stop for homemade gorditas and frijoles!  These are the summers that memories are made up of! I was lucky enough to have 2 sets of grandparents, but only my grandmother on my mothers side was retired at the moment, so we would stay there. I was lucky enough that my cousins were our age too! (I was 8, cousin 7, Sister 5, cousin 4)

 As Summer approaches and I plan our curriculum, I begin to think of those days! Planting and eating strawberries, searching the basement in hopes of finding old treasures belonging to our mothers, racing each other in the backyard and sometimes just spraying each other with the hose! I know I want similar memories for my children and right away thought that this was the perfect time for them to learn the basics of sewing! (Which is all I know, I own 3 sewing machines and even an antique Singer, but they do NOTHING, since I don't know how to operate them!LOL)

I rummaged around and put together a box from supplies I had around the house and a vintage Wil-hold sewing box. I love that the lid is removable, so that works as an easy access basket when they are working!
A small container holds safety pins, another holds spools of thick yarn and plastic needles and then thicker plastic cording that can be used without the needle (3 year old). Large Buttons, Spool of thick plastic cording,  measuring tape, scissors and plastic jar grips.

I use the plastic jar grips (pack of 4 1.00 at dollar store!) instead of fabric, because the holes are larger and make it easier for little fingers to figure out the ease of sewing. My 2 big kids dove right in when I pulled out this box a few weeks ago. The large buttons, help kids in learning the basics of sewing on a button! My oldest took to it right away and then my oldest son kind of gave up after awhile :)
Snuggled on the couch next to Mommy, my daughter loves to work on her sewing all the time! Every time I see her, I'm taken back to those hot Summers and before I know it, the air smells like home cooking and I have a crazy urge to pray the rosary!

What are you Summer memories???

Saturday, April 23, 2011

Crafting Stop!

 
 During the average week, I will make about 3 trips to Michaels and I love to check out every single nook and cranny and to see what's new and what all I can use in upcoming projects! I'm there constantly, since I am usually running in for custom work that someone requests from my shop. This week their 1.00 carousel has a VARIETY of alphabet stamps!! I love these for learning projects, making cards with the kids and all around just fooling around! These were such a steal, I took 3 different ones!
One of my favorite tips to do when I shop, is to print out my coupon and write my list on the back of it!! Since I constantly have my list with my as I shop, I know that I will not forget to hand over my coupon! I always get my craft store coupons online.
Here is this weeks coupon, just click to enlarge and then print! Enjoy your weekend readers!!!

~Michelle!~

Saturday, April 16, 2011

Thrift Stop!

After writing this post on thrifty teaching aids:
I have gotten many e-mails, to keep updating my fun buys! Remember that you don't have to go to a specific charity shop, just go into one! I for one can be a total store snob, I admit it, but thrifting is FUN! There are so many treasures you can unearth and believe me, I've often times found new in box toys and books and game sets that are perfect for lessons or inspire new ones. 

Today, I ran in just to do a quick check at the local Goodwill (snob about to come out here). I cannot stand this Goodwill and if I were the company I would invest in making it as nice as the others I have been to (every single other one) AND be more careful about what they put on the shelves (stained items, torn items, broken stuff etc.) The minute you walk into this one, you just get that ick feeling, BUT I figured I will give it a shot, since I struck out at my 2 other local stops.Go figure I found some great stuff!! 

I did take the time today to write them a customer note on their website with my receipt information, so hopefully that will help somewhat! haha!!On to the good stuff!

Goodnight Moon is HUGE, it's the Lap Size for the classroom and perfect for all 3 kids to see while I read at bedtime! The Vintage Clock is a puzzle too! This is going to be very helpful in teaching Roman the Time basics and we can also use the numbers in different games too! My favorite purchase was the magnetic Pattern Blocks and Book, these were in a ziploc freezer bag, so I put them in the red pouch to make it more portable. I then dug through my supplies and found a cute little iron on to pop onto the pouch to make it cute and my youngest son fell in love! 
I took an iron on patch that I had in my supplies and put it right on this drawstring bag I had and now this little set looks good as new and Roman has already started carrying it everywhere to play!
Goodnight Moon .79
Magnetic Blocks and Book .99
Clock .99
Total spent today under 3.00!!!

Thursday, April 14, 2011

For the Birds!


My youngest and I read books about birds and then we took our binoculars outside and watched for some as we lay on our backs and stared in the sky! We wondered what it would be like to fly and where we would go, Disney World (me!) and McDonald's (him!). We marveled at all the colors that could be found on birds and even visited a pet shop to look at birds that could be kept as pets! Upon coming home we started our craft of the day!

We dug around in our bucket of CAPS, CAPS, CAPS and found one that belonged to a trail mix bucket and we were ready to roll! We were going to make a bird feeder! We waited until the big kids got home from school, so that all could be involved in putting in the seed and hanging it up!  Let's hope we get some birds!

Share a link to your homemade bird feeders in the comment section please!!

I'm Blog Hopping Today!

Craft in a Minute! Easter Crosses

 Today we made a quick craft to go with our Stations of the Cross readings and also as something for Easter. How simple is this??? Clothespins and glue and paint! That's it!! Just make sure that an adult takes the clothespins apart, just in case the springs are a bit difficult. It will take 4 clothespins for 1 cross.
Do you have any quick crafts to share????


Linked up here:

Wednesday, April 13, 2011

Making Playdough!

Today we had some lesson plans on learning about time and crafting with clocks, but I decided to push that off to this afternoon, so that we could get in the kitchen and create something to take outdoors with us! My 3 year and old was an assistant today and he was eager to mix and play.  First, we gathered the ingredients needed (List at the bottom of page) and then I got out a mixing bowl. I know you can make it all over the stove, but I wanted my son to be able to help and I don't let him near the hot stuff in the kitchen. I had him toss it all in the bowl and mix it up and then I had the 2 cups of water in a large jar, where I let him squeeze the food coloring in and stir it up apart from the rest of the mixture, so he could see the color appear in the water first. We then mixed it all together into 1 bowl and got it prepped for the stove.


Once on the stove, mommy took over and for a second, I was unsure of what I was supposed to do other than stir it up (nothing). I used a recipe from a homework assignment my preschooler brought home and added some vanilla for scent. I tried looking for an internet recipe, but the first one I tried was missing the amounts of water I would need and then another one I had found didn't list some of the ingredients that I did have and added some that I didn't have in house, so I went with what I had!

After about 3 minutes, I was left with this incredibly shiny and sticky ball and I was so worried that I wasn't doing it right, but I kept on mixing for about 2 more minutes and it started to smooth out!!

Finally, we were successful!!! I used old store containers to hold the colored balls of dough and the kids have been having a blast ever since!! From start to finish it took us about 10 minutes and that's WASHING up afterwards too!!! I'm so happy to find something that my little ones love and can help with too!! I'm planning on putting small amounts into smaller containers to give to my daughters class for Easter!

What you will need:
2 cups of water
2 cups of flour
1 cup of salt
Food Coloring
1 TBSP of cooking oil
1 TBSP of Cream of Tartar

Mix everything together over medium-high heat and continue mixing and stirring for about 5-6 minutes. You will see the dough thicken and eventually begin to smooth over. Once you remove from stove, let it cool for 2 minutes and store in an airtight container!

I'm linking up here:
Photobucket


Monday, April 11, 2011

Craft in a Minute!

 This week's craft in a minute is so simple! This is a great way to breathe new life into an old puzzle or make some fun magnets. It's a great craft that even the youngest learners can get involved! The total for this project came out to be under 3.00!You need magnetic tape (2.99 with a 40% off coupon from Michaels) scissors and any old wooden puzzle, I picked this one up in the dollar section of Michaels too!
 Today, my partner was my 5 year old son! I used the scissors to cut the magnetic strips into the right sizes for each letter. I let him peel and stick away!! Before they were even done, the kids all had their magnetic boards out and were playing away!!
Can you tell they loved them???!!!

Wednesday, April 6, 2011

Busy Bag!

 We are on the road A LOT! We rarely if ever spend a weekend at home and with 3 kids in 3 different schools, activities, meetings etc. there is always something going on somewhere! Being constantly on the go means a lot of offices, restaurants, waiting and quiet time, so I developed a small bag that would keep them quietly busy while we are on the go!
While everything you see here really does all fit well into this bag, I only like to keep 6 things at most in here at a time and usually not all that much. It makes them appreciate each and every game and get really into it too!
 My 3 year old likes to now carry his own treat bags and backpacks, so I knew the new busy bag had to be his size! This is an old Fisher Price toy bag that we used to keep in the van when our daughter was a baby! It's finally found a new home. The following items, I don't discuss in detail, so I will just touch on them now. Clothespins are ALWAYS a fun activity no matter where they are, so I threw a couple of those in, along with some Ziploc baggies (always needed for something or other!), wipes and a reusable juice box round up the random bits that are in here!
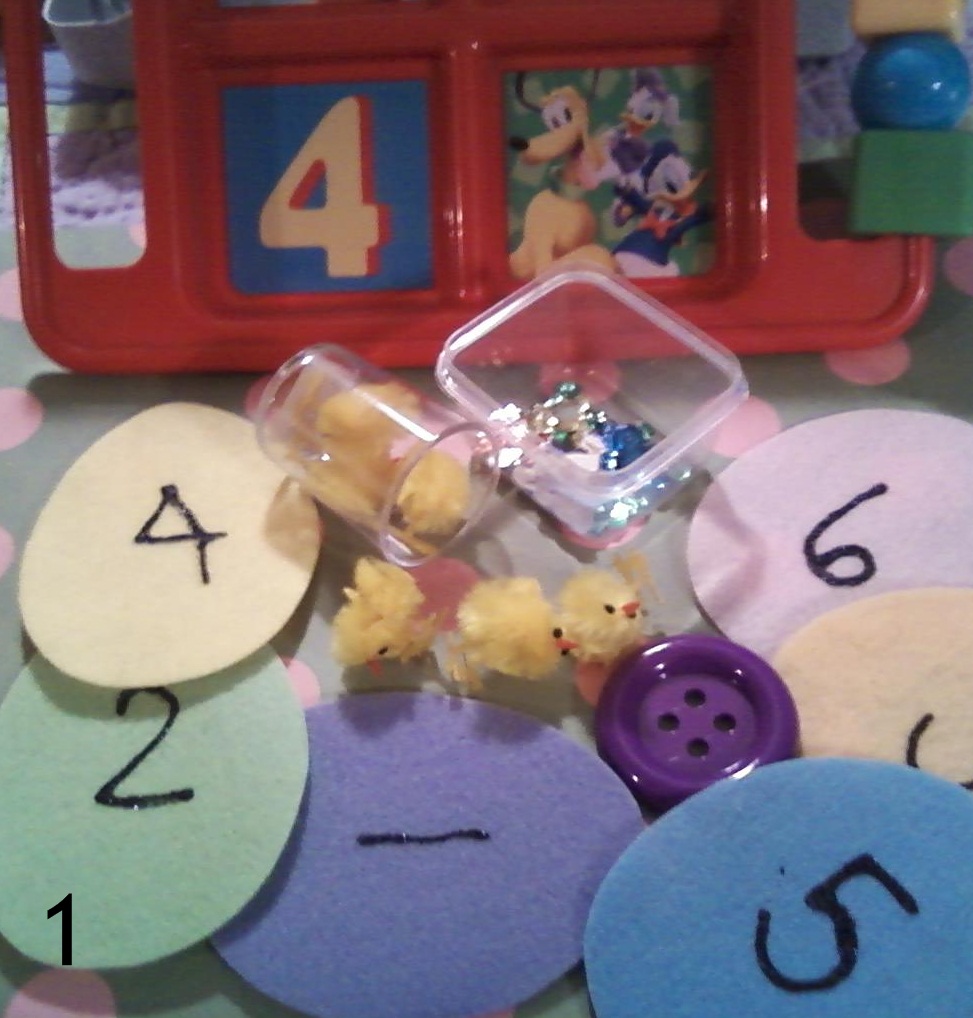
 1. Our Felt Easter Eggs Counting game. This is a fun game that I will go into more detail in tomorrow's post! I added baby chick and rhinestone counters too! These are fun alone or with the game, as I also included a sorting tray to turn 1 game into many more.
 2. Our craft in a minute coming this Friday is another must have in our busy bag! This is just cardboard pieces of 'road' that the kids piece together in multiple ways that always seems to make play last forever! There are 3 cars that we keep in here that I change out periodically, to make it more new and fun each time! Once in awhile I will add a new piece of road too.
 3.Button Snakes kit!These fun kits are such a blast to work with that all 3 kids often want to start with this! The buttons serve multiple purposes in this bag too!
4. A fun notebook, pencil, crayons and drawing direction die! I will touch on the die in a future craft in a minute post, but for now, I will tell you that this is definitely one of their favorite games to play while waiting in a restaurant. The person whose turn it is throws the die and then has to draw whatever comes up on top, the next person has to start where that person left off, drawing what they in turn roll. It's a super easy game, that gets crazier when the page starts getting really full! We like that even the youngest one in the family can get really into it.
 5. Caps Caps Caps! These fun caps are fun for word play! We like to spell out easy words and then pass the word to the next person where they can then add a letter or subtract a letter to form a new word! This one gets really entertaining!
6. Wrap Up Games. I found these awesome Wrap Up games on clearance at our local teacher store! There are 12 of them for only 3.00!! I couldn't believe it, I wish there had been more than 1 as these would have made an awesome giveaway or even gift in an educational basket. They start out very easy and get more difficult as you get to the 12th card. They are a very sturdy plastic and hold up well to play.
7. Memory, Story Dice and Hourglass. These are fun things that are so tiny, they can fit in a pocket if need be! The Memory Game was something we all had a blast making on a crafty afternoon and when the big kids play, because it's so easy, we add in an hourglass! The hourglass alone is also fun for watching and thinking of other games to play with it! We also love our story die, you roll it and start the story with what lands on top! Another craft-in-a-minute activity that was too fun for words that it instantly went onto our list of DIY gifts! We plan on making up one big basket full of our DIY activities very soon for 1 lucky winner! That will be coming up in the future! For now snag yourself a memory game!! 
8. Did you know that 3ft of yarn can be a blast for 3 kids? Neither did I, I put these 2 spools in here with 1 full of yarn for my son to unravel as he raveled it back up on the empty one. While that is a good game, they discovered that they could make 'bridges' for the clothespins, make shapes from tying one end to something and then wrapping it around somewhere else and on and on it goes!

9. Nuts and Bolts! I touch this later on this week, but a simple activity is so fun for everyone! (yup, even mom gets in on this one!!) they love to see who can screw on the most nuts onto 1 bolt the fastest, or  how many they can put onto all the bolts before the hourglass is up. These are just perfect everywhere and for all! (You can buy larger bolts and nuts if you worry about the size, but this is just right for my 3).

10. Topple Pieces. Our Topple game has loads of pieces (have you read my thrifty post?), so I knew I could snag away a bunch and they would go unnoticed. I have 30 of these that sit in their own little drawstring pouch and the kids try and see how many they can stack before they fall, who can stack 10 the fastest, how many they can stack before the hourglass time is up...etc. Fun in a pouch!
11. Number flashcards. Just a fun way to go through the numbers! Every other card has a chipboard number on it and the card following it has the matching amount of stickers. We take them off the ring, for a quick matching game sometimes.
12. Easter Alphabet Game! This fun game is very versatile and can be played so many ways too!!

Linked Up Here



Hope you liked your journey into our busy bag!!

Thursday, March 31, 2011

Craft in a Minute!

Need a craft for antsy kids that doesn't take long? Grab those eggs (you know you have HUNDREDS lying around!!) and a paper plate with some glue and scissors too! Cut out the center of the plate and glue on the eggs!!! We gave these out to Nana and Grandpa and have one on our door too! Super cute and super fun! Best of all? Super fast and inexpensive! Yay!

Wednesday, March 30, 2011

Thrifty Teaching Aids!

We LOVE board games at my house, but if your kids are like mine, the small pieces tend to wander off and get lost in that big black hole of nowhere! I Love to swing by the Goodwill and pick up any games that have small pieces that we go through like crazy! It's a super inexpensive way to build up extra pieces! As far as the game boards and extra pieces, we use many in crafts and others we just recycle if the local daycare doesn't need them!

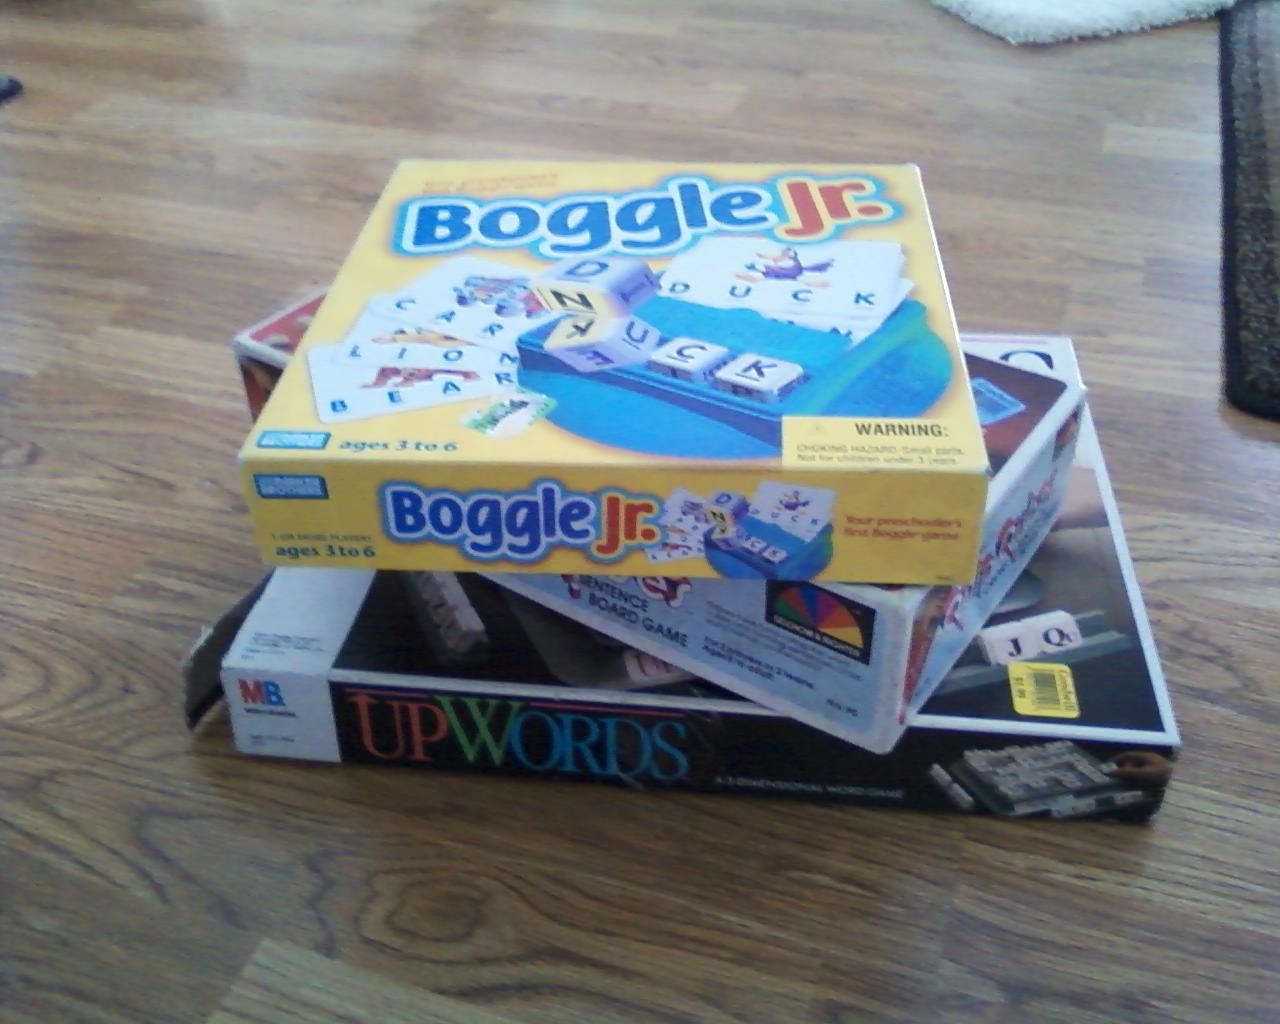
This post is about thrifty teaching aids though! My kids are all at different stages in learning, but I find that if I get creative, I can use 1 tool many different ways! This week I stopped at the Goodwill with a purpose! I needed some letter tiles and I couldn't use Scrabble ones, because I go though those like crazy in my shop! As I strolled the game aisle, I found exactly what I was looking for! I picked up 3 games for less than 5.00 total with tax and had exactly what I wanted! Boggle Junior, UpWords and Quip Qubes! These games are some of our favorites to play normally, so I was able to replenish the games we had and still have loads and loads leftover for
our learning games!
With the letter dice from the boggle game, I love to use these by tossing them in my purse with a notepad and pencil. They toss 1 of the die and then they figure out how many words they can come up with (My daughter writes them down and my son just says them). It's a fun game to play at a restaurant when meals get too long or when waiting in line for something etc. The UpWords we use to spell normal words and sentences and then try to change the words up just like the game goes, only using sentences! We use them all for other fun stuff too!!
I had purchased these yellow teaching tiles before (at the Goodwill of course!!) and even though I got them for only .99, they sell for so much more money than that, if i ever wanted to replenish them! I knew I had to get creative!
I found this freezer bin at the goodwill for .99 and it was perfect to hold all our letter tiles! It gives the kids easy access to them and allows me to keep an eye on them too! This is one of their favorite tools for spelling!
I used the cards from the Boggle Jr. Game and put them on a binder ring, so that my younger two can flip through and spell the words they see! Perfect way to get them spelling and playing with words!!
My favorite find was the Qube game! It had all these cubes in it and they all have words on each and every side!! These are AWESOME for sentence building and also just popping in between words we make with the tiles! I sometimes have my daughter grab 4 of them and toss them and see what kind of sentence she can come up with!
Keep your eyes open and get creative!!!
Related Posts Plugin for WordPress, Blogger...