This week's craft in a minute is so simple! This is a great way to breathe new life into an old puzzle or make some fun magnets. It's a great craft that even the youngest learners can get involved! The total for this project came out to be under 3.00!You need magnetic tape (2.99 with a 40% off coupon from Michaels) scissors and any old wooden puzzle, I picked this one up in the dollar section of Michaels too!
Today, my partner was my 5 year old son! I used the scissors to cut the magnetic strips into the right sizes for each letter. I let him peel and stick away!! Before they were even done, the kids all had their magnetic boards out and were playing away!!
Can you tell they loved them???!!!
Showing posts with label crafty mom. Show all posts
Monday, April 11, 2011
Saturday, April 9, 2011
More Fun with Buttons!
I have already mentioned how much I love buttons before, but my passion are vintage ones! Celluloid, pierced buttons always seem so magical! When I work with buttons for pieces in my shop, I often find little hands that are itching to get in my prized collection! I've learned to keep a sorting tray on a low shelf with a small jar of buttons just for them! They use these to sort the colors and sometimes pull out interesting ones along the way! A quick and easy tip to get some time for yourself!!
Labels:
bracelets,
buttons,
colorful giveaway,
counting,
crafting,
crafty mom,
crafty momma,
sorting,
true colors,
vintage buttons
Friday, April 8, 2011
Our Day!
Wow, it's not even 10am yet and Roman and I have been incredibly busy!

Rain Catcher!
After I took the big kids to school and he woke up, we hurried outside to check our rain catcher (not exact by any means, he made it with a ruler and applesauce jar and I just wrote the numbers where he said to), since we got a lot of water last night well into this morning! He was so thrilled, he wanted to play with it and a funnel, but it's too chilly for water play today! (Idea for rain jar came from here!)

Counting Marshmallows, Building with them and creating shapes!
I knew a melt down was coming if I didn't think of something cooler than playing with the rain water, so I ushered him inside and decided today would be our Marshmallow Day! I pulled some out along with an egg carton and he got to counting them (up to 12) and then we decided to make shapes out of them (using a polygon shape page) and finally we he decided he wanted to build with them! He had so much fun, that this lasted over an hour! (Another blog post will go into these activities in more detail).

Magnet Play!!
I'm off to drive the carpool in a bit, but this afternoon, we are going to be working with magnets again and seeing if has retained any information from before! What's even more fun is that Gabriel has only morning class today, so he will be able to join us!!

Punching circles!!
Hopefully this weekend sometime, I can squeeze in a stop to the craft store for more craft punches! He's been using my circle 1.5 inch cutter and having a blast! I would love to get many more geometric shape cutters, so that he can make a shape book in the future! So many plans, so little time!!
We had an AMAZING nature hike and picnic after school today, I will share more in another posting in the upcoming week!!
What did you do today???
Labels:
craft,
crafty mom,
magnets,
marshmallow shapes,
rain catcher,
science,
shape punches
Craft in a Minute!

You Need:
Scissors, Crayons, BLACK Duct Tape, Box
I am forever getting packages in the mail and looking for creative ways to use the boxes. Today after Roman and I gave the water table a good scrub down and waited for it to dry, I decided to start something new! I am putting together a busy bag to keep handy everywhere we go and I like practical everyday things for our bags that can easily be replaced if lost or broken!
I took 1small box and scissors, BLACK duct tape, white crayon and got to work!
First I cut the box apart at all the creases and then put tape on the pieces anywhere we wanted, then I handed Roman the white crayon and he dotted the roads! ALL SET! A match box road that can easily be moved and switched around, since there are so many pieces!!

Roman having a blast with just one part!!
He played for an hour when I first finished and after school when he showed Gabriel, they played for HOURS!! On cardboard and tape! Best part? If it gets broken it's no big deal we can make more!! I love sharing crafts with the kids that cost next to nothing to make and showing them just how much they can enjoy them!

Gabriel joins in on the fun!!
I am hoping to do one of these in a shoe box, with velcro sides that fold down and then they can add the extensions still the box can hold the cars, some houses and trees and signs and the extension pieces! I will then add a handle to make it portable. This is our next project when we get a bigger box around! My supplies always comes in tiny boxes.
Tape can be found at Michaels for under 4.00, go to ww.mycraftcoupons.com and get a 40% off coupon for the tape! Save more!!
*NOTE* We tried chalk, but it just wore off with use, which is why we went with crayon!
Thursday, April 7, 2011
Easter Egg Counting
We had some felt scraps that were dying to be given a new life, so we got busy! We cut them into egg shapes and used black puff paint to put numbers onto the eggs! Since this is a game for my 3 year old, we just went up to number 10 right now and only use them a little bit at a time, so as not to overwhelm him.
I start out round one with the eggs in order, but gradually mix them up as the game progresses!
Roman then uses buttons on each egg. 1 button on the number one, 2 buttons on the number 2 and so on and so forth. Sometimes we play a game where I say put a red button on number 3 and he will do that instead. We try to change it up each time we play!! Share your Easter themed crafts!!
Linked up at:
I start out round one with the eggs in order, but gradually mix them up as the game progresses!
Roman then uses buttons on each egg. 1 button on the number one, 2 buttons on the number 2 and so on and so forth. Sometimes we play a game where I say put a red button on number 3 and he will do that instead. We try to change it up each time we play!! Share your Easter themed crafts!!
Linked up at:
Labels:
buttons,
counter,
counters,
counting,
countries,
craft mother,
crafting,
crafty mom,
diy,
do it yourself,
easter craft,
eggs,
homeschool,
math manipulatives,
teacher,
thre year old
Tuesday, April 5, 2011
Box Tops used for EDUCATION!
I'm in the middle of counting up some more Box Tops, because many have that pesky June expiration date! I'm hoping to get them in the mail this week and decided to get my 3 kids involved in the long process! I decided to really turn this into a TRUE educational Box Tops experience! As I cut them down to the perfect square (saves on postage you know!) and put them in our Box Tops purple bucket! I got the younger 2 involved in another way!
My younger 2 are learning to count to 100, so we pulled out our hundreds chart and I gave them the purple bucket of Box Tops that we had cut down already and they placed them on the numbers 1-100! I colored the 50 box and told them when they reached there, they popped them in a bag and continued on. My oldest daughter already knows how to count to 100, so she would take the sealed bags from the boys and double check the count and make sure there were 50 in there! A fun way to teach and get stuff done, all while hanging out together!
As we worked this evening, we had Bach on the radio!
My younger 2 are learning to count to 100, so we pulled out our hundreds chart and I gave them the purple bucket of Box Tops that we had cut down already and they placed them on the numbers 1-100! I colored the 50 box and told them when they reached there, they popped them in a bag and continued on. My oldest daughter already knows how to count to 100, so she would take the sealed bags from the boys and double check the count and make sure there were 50 in there! A fun way to teach and get stuff done, all while hanging out together!
As we worked this evening, we had Bach on the radio!
Labels:
box tops,
box tops university,
btfe,
btu,
collection,
collector,
craft mother,
crafty mom
My Spin and Spell!
I wanted to make my kids some fun spellers that they could build their word vocabulary with and went through many ideas. I wanted a more industrial chic look that could be modern and fun. I started at the hardware store with a rough idea of what I wanted in my head.
For my youngest, I go down to 3 letters at times when he is learning new words and sometimes we just use 1 letter and I have him find the letters that I ask for, that way he gets a better understanding of letters. This is a game that we have all gotten into and tucks away easily into a busy bag or even my purse!! I've made about 12 different nuts of letters and we have 5 bolts so that there can be multiple games going on at once and the letters can be switched up often.
LETTERS USED:
For beginning readers try
F, L, M, N, R, S on the first hex
A, E, I, O, U, R on the middle one
B, D, G, P, T, S on the last one
For 150 pronounceable combinations
For More advanced combinations:
4th: s,t,e,d,r,n
5th: t,h,d,e,y,n
Linked Up:
I added these supplies to what I picked up from the hardware store (5 hex nuts, 1 carriage bolt and 1 lock nut). Make sure that your hex nuts are larger than your bolt so that they slide as opposed to screw up and down the bolt. This makes them easier to turn, the more nuts you add on.
I added the letters onto each side of the nuts and then put the mod podge on top of them to adhere them to the nut. Since my kids are at different vocabulary levels, I knew I needed to make it a game that they all could play! This was perfect! They could easily play the game with 2,3,4 and 5 letters (Just add or take away the nuts as needed) and when they think they've spelled them all, take them all out and mix around the order!!
LETTERS USED:
For beginning readers try
F, L, M, N, R, S on the first hex
A, E, I, O, U, R on the middle one
B, D, G, P, T, S on the last one
For 150 pronounceable combinations
For More advanced combinations:
4th: s,t,e,d,r,n
5th: t,h,d,e,y,n
Linked Up:
Labels:
alphabet,
crafty mom,
crafty mother,
diy,
diy mom,
hardware store,
homeschool,
learning,
spelling,
spinning,
spinny speller,
teaching
Wednesday, March 30, 2011
Thrifty Teaching Aids!
We LOVE board games at my house, but if your kids are like mine, the small pieces tend to wander off and get lost in that big black hole of nowhere! I Love to swing by the Goodwill and pick up any games that have small pieces that we go through like crazy! It's a super inexpensive way to build up extra pieces! As far as the game boards and extra pieces, we use many in crafts and others we just recycle if the local daycare doesn't need them!
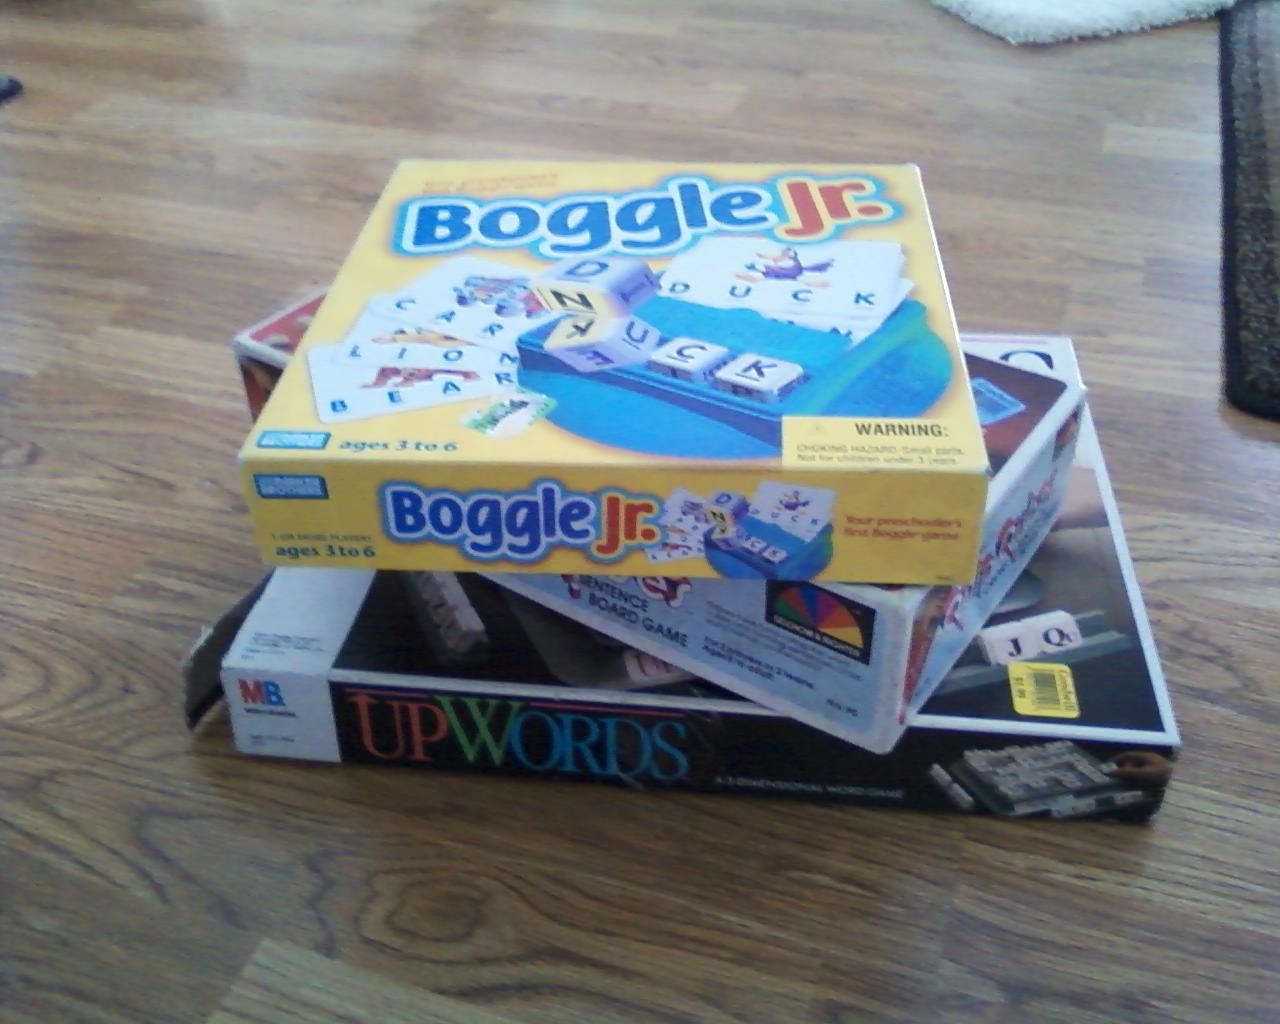
This post is about thrifty teaching aids though! My kids are all at different stages in learning, but I find that if I get creative, I can use 1 tool many different ways! This week I stopped at the Goodwill with a purpose! I needed some letter tiles and I couldn't use Scrabble ones, because I go though those like crazy in my shop! As I strolled the game aisle, I found exactly what I was looking for! I picked up 3 games for less than 5.00 total with tax and had exactly what I wanted! Boggle Junior, UpWords and Quip Qubes! These games are some of our favorites to play normally, so I was able to replenish the games we had and still have loads and loads leftover for
This post is about thrifty teaching aids though! My kids are all at different stages in learning, but I find that if I get creative, I can use 1 tool many different ways! This week I stopped at the Goodwill with a purpose! I needed some letter tiles and I couldn't use Scrabble ones, because I go though those like crazy in my shop! As I strolled the game aisle, I found exactly what I was looking for! I picked up 3 games for less than 5.00 total with tax and had exactly what I wanted! Boggle Junior, UpWords and Quip Qubes! These games are some of our favorites to play normally, so I was able to replenish the games we had and still have loads and loads leftover forour learning games!
With the letter dice from the boggle game, I love to use these by tossing them in my purse with a notepad and pencil. They toss 1 of the die and then they figure out how many words they can come up with (My daughter writes them down and my son just says them). It's a fun game to play at a restaurant when meals get too long or when waiting in line for something etc. The UpWords we use to spell normal words and sentences and then try to change the words up just like the game goes, only using sentences! We use them all for other fun stuff too!!
I had purchased these yellow teaching tiles before (at the Goodwill of course!!) and even though I got them for only .99, they sell for so much more money than that, if i ever wanted to replenish them! I knew I had to get creative!
I found this freezer bin at the goodwill for .99 and it was perfect to hold all our letter tiles! It gives the kids easy access to them and allows me to keep an eye on them too! This is one of their favorite tools for spelling!
I used the cards from the Boggle Jr. Game and put them on a binder ring, so that my younger two can flip through and spell the words they see! Perfect way to get them spelling and playing with words!!
My favorite find was the Qube game! It had all these cubes in it and they all have words on each and every side!! These are AWESOME for sentence building and also just popping in between words we make with the tiles! I sometimes have my daughter grab 4 of them and toss them and see what kind of sentence she can come up with!
With the letter dice from the boggle game, I love to use these by tossing them in my purse with a notepad and pencil. They toss 1 of the die and then they figure out how many words they can come up with (My daughter writes them down and my son just says them). It's a fun game to play at a restaurant when meals get too long or when waiting in line for something etc. The UpWords we use to spell normal words and sentences and then try to change the words up just like the game goes, only using sentences! We use them all for other fun stuff too!!
I had purchased these yellow teaching tiles before (at the Goodwill of course!!) and even though I got them for only .99, they sell for so much more money than that, if i ever wanted to replenish them! I knew I had to get creative!
I found this freezer bin at the goodwill for .99 and it was perfect to hold all our letter tiles! It gives the kids easy access to them and allows me to keep an eye on them too! This is one of their favorite tools for spelling!
I used the cards from the Boggle Jr. Game and put them on a binder ring, so that my younger two can flip through and spell the words they see! Perfect way to get them spelling and playing with words!!
My favorite find was the Qube game! It had all these cubes in it and they all have words on each and every side!! These are AWESOME for sentence building and also just popping in between words we make with the tiles! I sometimes have my daughter grab 4 of them and toss them and see what kind of sentence she can come up with! Keep your eyes open and get creative!!!
Labels:
craft mother,
crafty mama,
crafty mom,
fun,
funky,
goodwill,
mommy,
new finds,
parent,
recycle,
reduce,
repurpose,
repurposing,
reuse,
shopping,
thrift store,
thrifty
Tuesday, March 29, 2011
Things I Am Loving Right Now....
This week, I am going to share normal every day things or inexpensive activites that have me swooning in love!
#1 and the entire reason for this post this week is the library self check out station! It is ALWAYS empty, even when the 6 staff members are all 3 people deep with lines, nobody ever wants to try this and it's so so so simple!! The best part? You don't have to print out receipt, you can just have it e-mailed to yourself!! (I love this, because it allows me to incorporate it into my online calendar, where I can pop in their return date and the list of books that we have out!)
Rub on letters! These were .99 from Michaels and are a total dream to a Mommy that needs a craft that all of her kids (3,5 and 6) can do together!! We've put them on rocks, paper, wood cut outs and easter eggs! All in preparation for Easter!!
Our new magnetic chore chart that is as simple as library pockets, popsicle sticks and paper men! We had fun creating it and also assigning jobs for the week!
Labels:
chore chart,
craft mother,
crafter,
crafty mom,
love,
loving,
paper goods,
parent,
pre school,
pta,
pto,
room mom,
st peter grade school,
toddlers
Monday, March 28, 2011
Creative Experiment Rubber Bands!

I love to read blogs in the morning with my cup of tea, feeling the warm sunshine on my face (after I have driven the carpool, and tidied up of course! haha) and taking an hour to myself. When I came across Tinker Labs Creative Experiment Post today, I knew I had just the project for my youngest and I! The weather went from fabulous to blahh this week and I wanted something that would cheer us up and get our gears cranking! We pulled out his ducky blanket, popped some Vivaldi on the radio (okay the Comcast classical channel!!) and got to thinking! Within 5 minutes he yelled "Make Guitar!" and we were off and running!!
We pulled out our yogurt container of rubber-bands from the craft bin, pulled down our big art case for the oil pastels and finally snagged the right size box from our cardboard bin! He started slipping on the bands, while I handed them to him and then we decorated the box afterwards! He loves it and is now off and singing Bannie Bill (No CLUE!) and dancing around! SO CUTE!
Do you have any ideas on what to make with rubber-bands???
Labels:
art show,
craft,
crafty mom,
crafty momma,
experiment,
guitar,
music,
parents club,
playing,
rubber bands,
science,
tinnker labs,
toddler,
vivaldi
Sunday, March 27, 2011
Caps Caps Caps!
I have been saving caps for quite some time (If you can see the bucket, we started around Halloween time!!)! We keep this small bucket on the kitchen counter (Does wonders for the decor!) and then empty it out regularly to our box the holds the real collection, hey how did that Box Top get in here?? We first started saving caps when we made a space ship and used the caps as buttons and dials and knobs and even a steering wheel with the largest one! It was so much fun we decided to keep on saving!!
One of our first and favorite creations with the caps was an alphabet memory game! We put stickers in matching white bottle caps (yikes, you can tell how much bottled water we drink!!) and then we turn them upside down and get matching!! We plan on putting colored garage sale dots on the one side of these eventually, because if we play outside, you can see through a little bit with the bright sun!!
Pictured here is only 1 set, just so you could see the letters closely!!
Labels:
activities,
alphabet,
bottle cap,
crafts,
crafty mama,
crafty mom,
create,
diy,
do it yourself,
plastic,
writing manipulatives
Saturday, March 26, 2011
This Week in Photos!
Welcome to our week in photos! We had another Blessed week and cannot wait to enjoy our weekend! I hope you are having a fantastic Saturday! We are headed out to dinner to celebrate my birthday with friends and family!! (Yes, I had a birthday on the 23rd! I turned 31 YIKES!! Lol!
With the chill still in the air, we headed out anyway and hit one of our favorite hideaways on the bike path in search of river rocks for our nature table and rock project. we enjoy spending time together and being outdoors!
This week my youngest (he is not in school yet) and I worked on Easter wreaths! This was made of a paper plate and tiny eggs (will post more about this later in the upcoming week) and some ribbon. We plan on giving these out this weekend to family members to help them decorate their home for the Holiday!!
We also worked on our address book after school one day! We are sending out Easter cards and this helps my older two know how to address and envelope and get stamps etc. A fun project that gets everyone involved!
My oldest boy (I really dislike the middle son title! I don't like him thinking that he's in the middle, I know that probably makes me weird! haha) is leader of his school this week (They call it the Big Cheese) and he is all smiles about it!! I am very proud of him, as this is his 3rd time this year!!
We found this tutorial on how to make a felt bunny on Natural Kids, I am hoping to eventually make a pin for the teachers this year, but for now we are using it as a template to cut out Bunnies for our Easter Cards!!!
We made magnets out of a 1.00 puzzle and we had a BLAST!!! The process is so much fun for little fingers, but at the same time we can even use them!! They want to make more and for 1.00 I just may give in!!
Labels:
address book,
aries,
birthday,
crafts,
crafty mom,
crafty momma,
easter,
magnets,
march,
photos,
pictures,
weekly
Subscribe to:
Posts (Atom)